Chess Board Starting Position With Labeled Pieces (2026 Printable)
A one-page setup sheet with every piece named, every square lettered, and a clear board orientation for new players.
Free downloads
PDFs, 0.9 inch squares. Print at 100% (actual size), not “fit to page”.
- Blank board with coordinates: US Letter · A4
- Blank board, no coordinates: US Letter · A4
- Board with pieces in the starting position: US Letter · A4
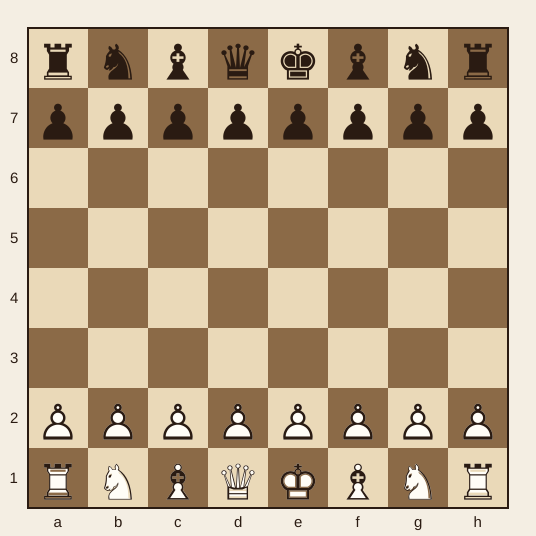
A labeled chess board starting position is the same setup every game: 32 pieces, 16 per side. White's back rank from a1 to h1 is rook, knight, bishop, queen, king, bishop, knight, rook. Black mirrors it on a8 to h8. White pawns fill a2 through h2; Black pawns fill a7 through h7. White queen on d1, a light square. Black queen on d8, a dark square. Kings on e1 and e8.
That's the whole starting position. The labels on the printable use the same six piece names: pawn, rook, knight, bishop, queen, king. If you want the names first, the chess pieces page covers all six types.
The starting position, square by square
Here's the back-rank table I'd hand a new player. It has eight rows, one per file, and it names both back ranks in plain English.
| File | White square | White piece | Black square | Black piece |
|---|---|---|---|---|
| a | a1 | Rook | a8 | Rook |
| b | b1 | Knight | b8 | Knight |
| c | c1 | Bishop | c8 | Bishop |
| d | d1 | Queen | d8 | Queen |
| e | e1 | King | e8 | King |
| f | f1 | Bishop | f8 | Bishop |
| g | g1 | Knight | g8 | Knight |
| h | h1 | Rook | h8 | Rook |
Pawns go on the second rank for White (a2 through h2) and the seventh rank for Black (a7 through h7). That's eight pawns per side, 16 pawns total.
The rank numbers run 1 to 8 from White's side; the files run a to h from White's left. That's why a1 is White's left corner and h1 is White's right corner.
The corner piece is the rook, and it starts on a1 and h1 for White, a8 and h8 for Black. The what is a rook page covers its movement if the name is still fuzzy.
On the printable, every one of the 64 squares carries its coordinate, and every piece has a small label. The labels use six piece names, not chess notation.
What to print and how to scale it
The free printable files are linked on this page: a one-page labeled setup sheet and a four-page tiled board. The set has 32 pieces, and the how many pieces in chess page breaks the count down by type if you need a check. Print the one-pager on US Letter (8.5 by 11 inches) or A4 (210 by 297 mm) at 100 percent. Turn off "fit to page" if the labels look small. The one-page squares come out around 1 inch. That's a reference sheet, not a playing surface.
For a board you can play on, print the tiled file at 100 percent across four sheets. Trim the margins, tape the seams, and check a square with a ruler. You want 2 to 2.25 inches, the range US Chess gives for square size. A full 8x8 board at 2-inch squares is 16 by 16 inches, so it can't fit on one letter sheet. If your square measures 1.75 inches, bump the scale in 5 percent steps and print one page again.
The one-page sheet has one real weakness: at 1-inch squares, it's too small for a tournament game. I'd still print it for a classroom, because a setup map gets used more than a second board.
Laminating the sheet so it survives a club bag
Laminate the one-page reference with a 3 mil or 5 mil pouch. Trim the paper so you leave a 1/8 to 1/4 inch border inside the pouch; that border keeps the seal from peeling. And a 5 mil pouch is stiffer for a classroom, while 3 mil is fine for a folder. Use a dry-erase marker on the laminate to circle d1 and e1 during a lesson. I'd pair it with a learn chess plan for the first six sessions.
The two orientation checks that stop bad setups
Set the board so each player has a light square in the right-hand corner. White queen on d1, light. Black queen on d8, dark. If both queens sit on the same color, rotate the board 90 degrees. The king sits on e1 and e8; the king in chess page covers why the king starts beside the queen and not on the queen's square.
Setting up the pawns and back rank in under a minute
Start with the back rank only. Name the eight pieces from a1 to h1, then let the learner place them. Add eight pawns on rank 2, then mirror on ranks 8 and 7. That's 32 pieces. By the third try, the learner should need less help; I'd time that third setup with a phone timer. I've watched adults fix the queen color in round one, and the labels solve that faster than a lecture.
Where the labels help most, and where they don't
The labels help with names and coordinates. But the labels don't teach legal moves. A labeled starting position won't tell you that a bishop stays on its color or that the queen can't jump. That's fine. Setup is the first step, not the whole game. Once the pieces are in place, move to chess piece values so the learner knows a pawn is 1 point, a knight 3, a bishop 3, a rook 5, and a queen 9.
Questions people ask me
Which way does the chess board go for the starting position?
Put a light square in each player's right-hand corner. The white queen starts on d1, a light square, and the black queen starts on d8, a dark square. If the queens face each other on light squares, the board is oriented wrong.
Where do the pieces go in the starting position?
Rooks go on the corners, knights next to them, bishops beside the knights, queen on d1, and king on e1. Pawns fill the second rank for White and the seventh rank for Black. Black mirrors it on ranks 8 and 7.
Can I print this on A4 paper?
Yes. Print at 100 percent, or use fit-to-page only if your printer clips the edge. Check one square with a ruler after printing; the tiled file should give you 2 to 2.25 inches on letter or A4.